From: Polin Wei
Arguments:
big5lp -c -d$PROFILES$.PRINTER -n$PROFILES$.CONC_COPIES -t"$PROFILES$.TITLE" $PROFILES$.FILENAME
script location under AP Tier,
[prodmgr@ebsap1 ~]$ cd $AD_TOP/bin
[prodmgr@ebsap1 bin]$ ls -l big5lp
-rwxrwxr-x 1 prodmgr dba 566 Dec 13 2007 big5lp
[prodmgr@ebsap1 bin]$ cat big5lp
#!/bin/ksh
## AD Character-set Conversion session
adncnv $5 UTF8 $5 ZHT16BIG5
/usr/bin/lp $1 $2 $3 $4 $5
廣告聯播
2015年12月15日 星期二
2015年12月3日 星期四
Cisco Nexus 3064 Switch 封包收集設定
From: Polin Wei
Nexus SW 設定
switch(config)# monitor session 1
switch(config-monitor)# source interface port-channel 10 both
switch(config-monitor)# destination interface ethernet 1/#
switch(config-monitor)# no shut
switch(config-monitor)# int ethernet 1/#
switch(config-if)# switchport monitor
#為設定要收取封包的 port
設定完成後可以執行下列指令確認 session:
switch#show monitor session 1
WireShark 下載
要下載 WireShark,可以到這個網址: https://www.wireshark.org/
其中可以設定要看電腦的哪一張網卡,比較特別的是要在
Edit -> Preferences -> Capture 的設定裡面,Capture packets in promiscuous mode 要選取。
這樣電腦才會忽略 packet 的 MAC 比對,進而達到收取封包的目的。
收取的封包可以在 Capture -> Option 裡的 Output 設定將其存成一個檔案。
收取的封包可以在 Capture -> Option 裡的 Output 設定將其存成一個檔案。
2015年11月6日 星期五
Cisco 指令管理筆記
From: Polin Wei
Cisco 常用指令。
Cisco 常用指令。
1.
Config# enable password "明碼"
Config# enable Secret "暗碼"
Config# service password-encryption ← telnet 密碼加密
2.
Config# line console 0
Config-line# exec-timeout 0 0 ←保持console連線,注意有安全疑慮
Config-line# logging synchronous ←使游標還原到原來位置,重新顯示被覆蓋的命令
3.
# clock rate
DCE 設備的 interface 需設定 clock rate 64000 數字部分看狀況
4.
# sh process cpu ←查看 Process 的 CPU 使用狀態
# sh session ←看telnet的聯接
# clear line [號碼] ←清除telnet連接
5.關閉Debug
# no debug service ←關閉偵測除錯
# no debug all ←關閉所有偵測除錯
6.
# sh spanning-tree
檢查 switch 上每各 port 為 forwarding 還是 blocking,可在L2上使用
7.
Config# mac-address-table static 1111.1111.1111 fa0/9
設定靜態Mac對應來限制封包從哪些特定來源才能通過
# sh mac-address-table static
8.
Config# mac-address-table secure 1111.1111.1111 fa0/9
設定具有安全性的 mac 是要確保只有特殊設備才能連上指定的 port
# sh mac-address-table secure
9.
# sh port security ←檢查有安全性設定的port
Config# mac-address-table secure 1111.1111.1111 fa0/9
設定具有安全性的 mac 是要確保只有特殊設備才能連上指定的 port
# sh mac-address-table secure
9.
# sh port security ←檢查有安全性設定的port
VLAN 實作可參考 http://www.netadmin.com.tw/article_content.aspx?sn=1201100001
10. VTP (VLAN trunking Protocol)
*範圍相同的VTP領域(domain)名稱,而且互相連結在一起的switch
*VTP mode有三種,Server, Transparent, Client
*Server mode可建立、刪除、修改vlan,並進行資訊同步化
*Client mode只可接收被同步化
*設定vlan domain與密碼
# vlan database
(vlan)# vtp domain magic password cisco
*設定VTP模式
# vlan database
(vlan)# vtp client (or # vtp server)
*顯示 VTP
# sh vtp status
*檢查 VLAN
# sh vlan
or
# sh vlan brief
11.在交換器上設定Vlan
Config-if# int fa0/2
Config-if# switchport access vlan 2
Config-if# int fa0/3
Config-if# switchport access vlan 3
Config-if# int fa0/4
Config-if# switchport access vlan 4
Config# vlan 2-10 ←同時建立 2-10 的vlan
Config-vlan# end
Config# no vlan 2-10 ←同時刪除 2-10 的vlan
注意:只可以同時對一個vlan進行命名
12.
設定 trunk(2960)
Config# int fa0/2
Config-if# switchport mode trunk
設定trunk(3750 or 6509)
Config# int fa0/2
Config-if# switchport mode trunk
設定trunk
Config-if# switchport trunk encapsulation dot1q
1.進入介面配置 Switch(config)
# interface fastethernet 5/8
2.關閉介面
Config-if# shutdown
3.選擇封裝類型
Config-if# switchport trunk encapsulation dot1q
4.配置介面允許通過 VLAN
Config-if# switchport trunk allowed vlan 1,5,11,1002-1005(add,all,except,none,remove)
5.配置界面為trunk
Config-if# switchport mode trunk
6.指定 trunking native vlan
Config-if# switchport trunk native vlan 99
7.Switch(config-if)# switchport nonegotiate
8.啟動介面
Config-if# no shutdown
9.檢查trunk配置
# show interfaces fastEthernet 5/8 switchport
fa5/8
Switchport: Enabled
Administrative Mode: trunk
Operational Mode: trunk
Administrative Trunking Encapsulation: dot1q
Operational Trunking Encapsulation: dot1q
Negotiation of Trunking: Off
Access Mode VLAN: 1 (default)
Trunking Native Mode VLAN: 99 (trunk_only)
Trunking VLANs Enabled: 1,5,11,1002-1005
Pruning VLANs Enabled: 2-1001
13.Access Link 允許一個 Vlan 在線路上傳遞資料,Trunk Link 允許一個以上 Vlan 傳遞資料
14.CIDR指的是,192.168.0.1 和192.168.1.1 分別屬於兩各不同的 class C,若要整合進去同一筆,可向前借位,將原來要兩筆192.168.0.0/24,192.168.1.0/24 改成 192.168.0.0/23,打破原來class A, B, C的限制。
15.ip subnet-zero 告訴 Router 打破不能使用第一個與最後一個子網路的規則。
16.想在某一介面下新增第二筆IP,使用
Router(config-if)# ip address 172.16.20.2 255.255.255.0 secondary
17. # sh protocols ←可檢視每各介面的第一層與第二層狀態
18.static route:
# ip route [destination_network] [mask] [next-hop_address]
Ex:
(config)# ip route 172.16.3.0 255.255.255.0 192.168.2.4
*使用sh ip route,可看到S標記
# ip route 172.16.3.0(遠端,也就是要去哪個網段) 255.255.255.0 192.168.2.4(下個router ip)
19.
Jan 02 12:59:26 163.25.96.241 134: *Mar 1 01:49:23: %SYS-4-CONFIG_RESOLVE_FAILURE: System config parse from (tftp://255.255.255.255/network-confg) failed
Jan 02 13:00:04 163.25.96.241 135: *Mar 1 01:50:01: %SYS-4-CONFIG_RESOLVE_FAILURE: System config parse from (tftp://255.255.255.255/cisconet.cfg) failed
Jan 02 13:00:42 163.25.96.241 136: *Mar 1 01:50:39: %SYS-4-CONFIG_RESOLVE_FAILURE: System config parse from (tftp://255.255.255.255/eng4f-confg) failed
解決方式:(config)# no service config
20.OSPF設定
# Config t
# router ospf 1 (1無意義,可隨意選數字)
# network 10.1.1.1 0.0.0.0 area 0 (0為區域碼,需相同才能互通)
# network 10.5.2.1 0.0.0.0 area 0
檢查設定指令
# sh ip route
# sh ip ospf
# sh ip ospf database
# sh ip ospf interface
# sh ip ospf neighbor
# sh ip protocols
OSPF debug
# debug ip ospf events
# debug ip ospf packet
21.default route
# ip route 0.0.0.0 0.0.0.0 192.168.1.9(下個router IP,或自身要離開的介面,如s0/0)
使用 default route,必須加上ip classless
另一種寫法
# ip default-network 217.124.6.0
Config# sh ip route ←檢查
22.設定 domain server
# ip domain-lookup ←預設即打開,如未使用建議可關閉
# ip name-server 163.25.114.1
# ip domain-name cgu.edu.tw
23.不讓日誌消息打擾你的配置過程
Cisco IOS中另一個我認為的小毛病就是在我配置路由器時,控制臺介面就不斷彈出日誌消息(可能是控制台端口,AUX端口或VTY端口)。要預防這一點,你可以這樣做。所以在每一條端口線路上,我使用日誌同步命令。舉例如下:
Router(config)# line con 0
Router(config-line)# logging synchronous
Router(config)# line aux 0
Router(config-line)# logging synchronous
Router(config)# line vty 0 4
Router(config-line)# logging synchronous
除此之外,你可以在端口上修改這些端口的執行超時時間。例如,我們假設你想禁用 VTY線路上默認的十分鐘超時時間。在線路配置模式下使用 exec-timeout 0 0 命令,使路由器永不退出。
24.備份IOS
Router(config)# copy flash tftp
25. 升級IOS
Router(config)# copy tftp flash
補充:
26. 設定 Port Mirroring
Switch(config)# monitor session 1 source interface gigabitEthernet 0/1 both (source可以是vlan or interface, both表示進出traffic, 也可以單獨, 按?有說明)
Switch(config)# monitor session 1 destination interface gigabitEthernet 0/2 (目的地interface指的是sniffer接的interface)
2015年11月5日 星期四
vSphere 5.x vMotion功能開啟
From: Polin Wei
vMotion功能是VMware
vSphere最重要的功能之一,不過vMotion除了要架設Cluster環境外,還要經過一些設定才可以使用。檢視Configure的
Networking內,網路有vMotion選項的有Management
Network和連接iSCSI的VMkernel,vMotion所使用的網路是VMkernel,其實建立VMkernel步驟過程就可以設定開啟
vMotion,不過預設不勾選,必須要自行勾選,尤其是從VMware vSphere Hypervisor免費版本再加入vCenter
Server
管理,很多的VMkernel都沒有勾選,所以要使用vMotion前就要先檢視VMkernel是否有勾選,以下圖環境來做示範。
 若移動虛擬機器的ESXi主機的VMkernel無勾選vMotion就會出現Change host反白無法選擇的警告訊息。
以下介紹怎樣開啟網路介面卡的vMotion功能,不管只是設定VMkernel,也會設定Management Network。其實只要有設定IP位址的部分就有vMotion選項,VMkernel和Management Network都是有使用到IP位址。


要移轉的ESXi主機出現The vMotion interface is not cconfigured,代表該ESXi主機未勾選。

ref: http://download.ithome.com.tw/article/index/id/4336
vMotion功能開啟
Step1: 先點選vSwitch 0的【Properties】。
Step2: vSwitch 0 Properties的Port選單點選Management Network,按【Edit】。
Step3: Management Network Properties的General選單勾選【vMotion】,勾選完畢後,按【OK】。
Step4: 點選vSwitch 1的【Properties】,vSwitch1 Properties的Port選單點選VMkernel,按【Edit】。
Step5: VMkernel Properties的General選單勾選【vMotion】,勾選完畢後,按【OK】。
要移轉的ESXi主機出現The vMotion interface is not cconfigured,代表該ESXi主機未勾選。
ref: http://download.ithome.com.tw/article/index/id/4336
2015年11月3日 星期二
VCenter 5.5 install on Windows Server 2012R2 with oracle database
From: Polin Wei
VCenter 5.5 install on Windows Server 2012R2 with oracle database ,有幾個要注意的地方,在此僅記錄重點。安裝的順序可以使用 Simple Install ,或是單獨逐一依 Custom Install 安裝。
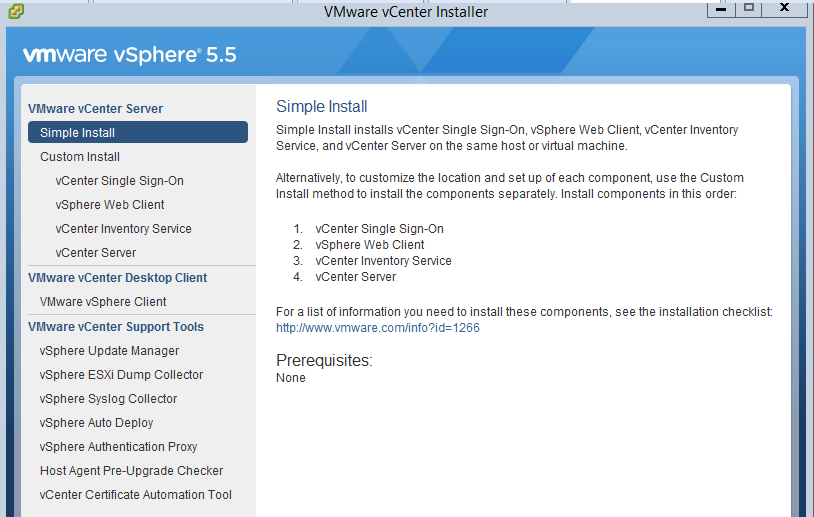
環境:
1. windows server 2012 R2 多國語言;注 意安裝時,1. 預設語言要切換為 英文 才不會有錯誤 2. VCenter 的 Host 要先加入AD網域,Vcenter 的權限才有辦法選到 AD 網域的帳號,不然就要用帳號: administrator@vsphere.local 登入 https://vcenter:9443/vsphere-client 到 SSO 作設定了。
2. VCcenter 5.5 :VMware-VIMSetup-all-5.5.0-VMware vCenter Server 5.5 Update 2e and modules-2646481-20150401.iso
3. Oracle DataBase: 11gR2_11204_WIN64
安裝注意事項:
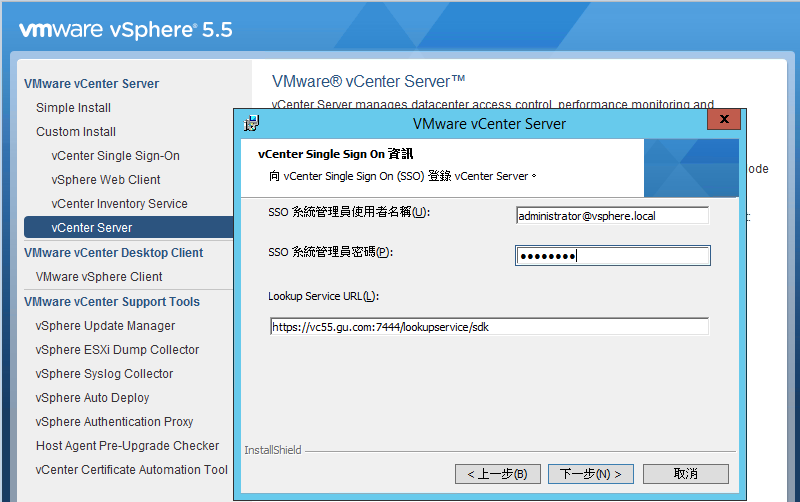
一、 依序安裝 vCenter Single Sign-on , vSphere Web Client , vShpere Inventory Service 時,不會連結到oracle database ;只有安裝 vCenter Server 才會連結到 Oracle DB,但 vCenter Single Sign-on 的 Administrator 密碼要記得,後續安裝都會用到它。
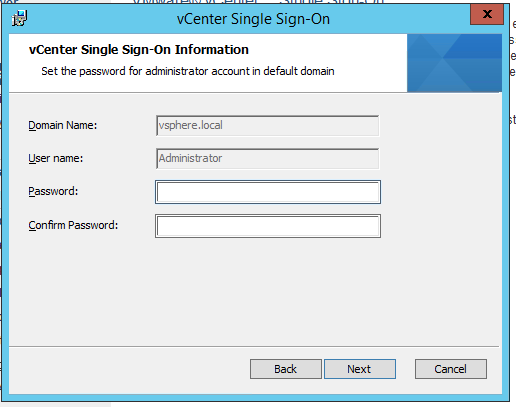
例如:vCenter Server 安裝時
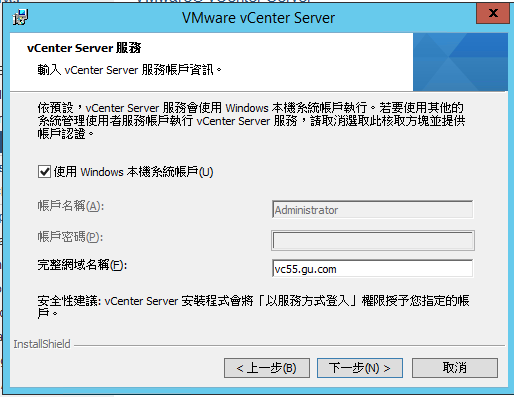
二、vCenter Service 使用Windows 本機系統帳戶
三、 vCenter 安裝後第一次用 vShpere Client 登入會有錯誤。
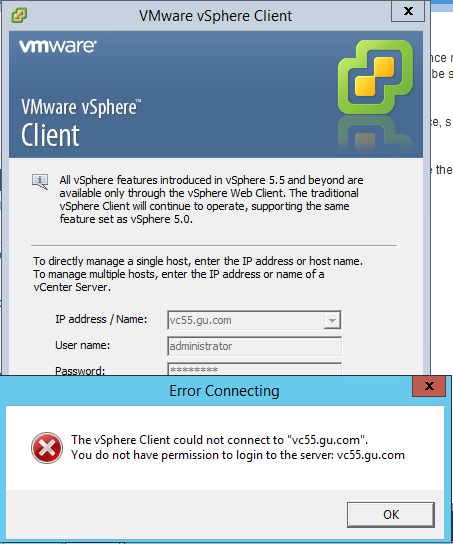
1. 使用 google Chrome 需先登入 vShpere web clinet: https://vc55.gu.com:9443/vsphere-client ,使用帳號:administrator@vsphere.local 登入
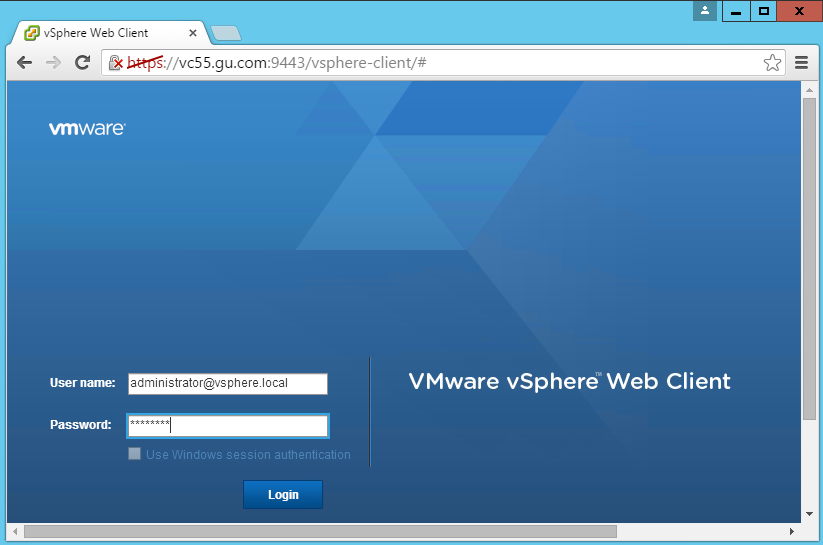
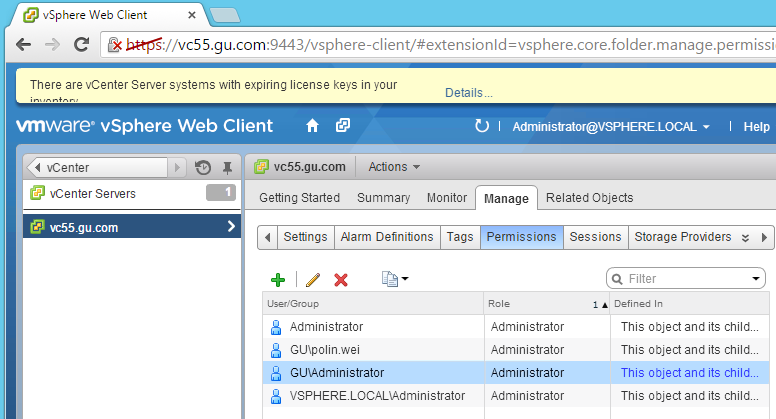
2. 在 vCenter Servers 中選擇主機 VC55 加入 本機 及 AD網域 的 administrator 權限
VCenter 5.5 install on Windows Server 2012R2 with oracle database ,有幾個要注意的地方,在此僅記錄重點。安裝的順序可以使用 Simple Install ,或是單獨逐一依 Custom Install 安裝。

環境:
1. windows server 2012 R2 多國語言;注 意安裝時,1. 預設語言要切換為 英文 才不會有錯誤 2. VCenter 的 Host 要先加入AD網域,Vcenter 的權限才有辦法選到 AD 網域的帳號,不然就要用帳號: administrator@vsphere.local 登入 https://vcenter:9443/vsphere-client 到 SSO 作設定了。
2. VCcenter 5.5 :VMware-VIMSetup-all-5.5.0-VMware vCenter Server 5.5 Update 2e and modules-2646481-20150401.iso
3. Oracle DataBase: 11gR2_11204_WIN64
安裝注意事項:
一、 依序安裝 vCenter Single Sign-on , vSphere Web Client , vShpere Inventory Service 時,不會連結到oracle database ;只有安裝 vCenter Server 才會連結到 Oracle DB,但 vCenter Single Sign-on 的 Administrator 密碼要記得,後續安裝都會用到它。

例如:vCenter Server 安裝時

二、vCenter Service 使用Windows 本機系統帳戶

三、 vCenter 安裝後第一次用 vShpere Client 登入會有錯誤。

1. 使用 google Chrome 需先登入 vShpere web clinet: https://vc55.gu.com:9443/vsphere-client ,使用帳號:administrator@vsphere.local 登入

2. 在 vCenter Servers 中選擇主機 VC55 加入 本機 及 AD網域 的 administrator 權限

2015年11月2日 星期一
jQuery Countdown 網頁倒數計時
From: Polin Wei
在網頁上實作倒數計時讓使用者知道多久會被導向到另一個網站,這個功能常會用在網站改網址或者是要告知一些重要事項。作法如下:
jQuery: jquery-1.11.1.min.js
jquery.countdown: jquery.countdown.min.js
下載上面兩個 java script,然後再寫一個網頁 index.html,即可。
(繼續閱讀...實例)
在網頁上實作倒數計時讓使用者知道多久會被導向到另一個網站,這個功能常會用在網站改網址或者是要告知一些重要事項。作法如下:
jQuery: jquery-1.11.1.min.js
jquery.countdown: jquery.countdown.min.js
下載上面兩個 java script,然後再寫一個網頁 index.html,即可。
(繼續閱讀...實例)
2015年10月23日 星期五
Generate New SID in Server 2012
From: Polin Wei


參考: http://www.mustbegeek.com/generate-new-sid-server-2012/
Generate New SID in Server 2012
Log on to Windows Server. Open Windows Explorer, and browse, C:\Windows\System32\Sysprep
Right-click sysprep application and click Run as Administrator.
System Preparation tool will open as shown below. Choose Enter System Out-of-Box Experience (OOBE) option, check Generalize option, choose Reboot as shutdown options and click OK.
The application will generate new SID and perform all the required actions and will reboot.
After the reboot, you will be asked to
enter the product key (optional), accept License terms, and enter new
Administrator password. You can then, login to the server and change
Host name and IP address. In this way you can generate new SID.
參考: http://www.mustbegeek.com/generate-new-sid-server-2012/
2015年10月20日 星期二
vCenter6 安裝
From: Polin Wei
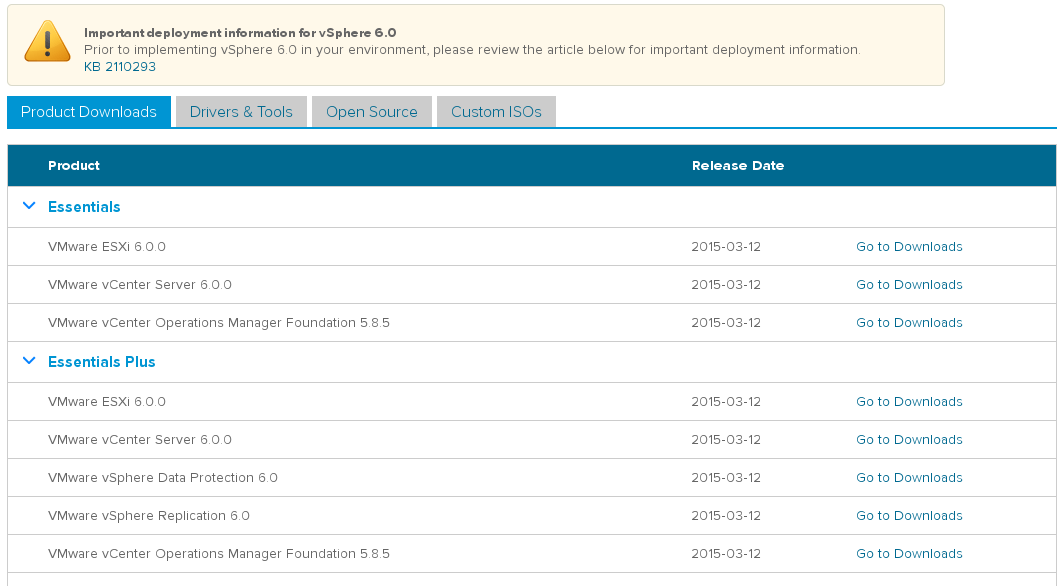
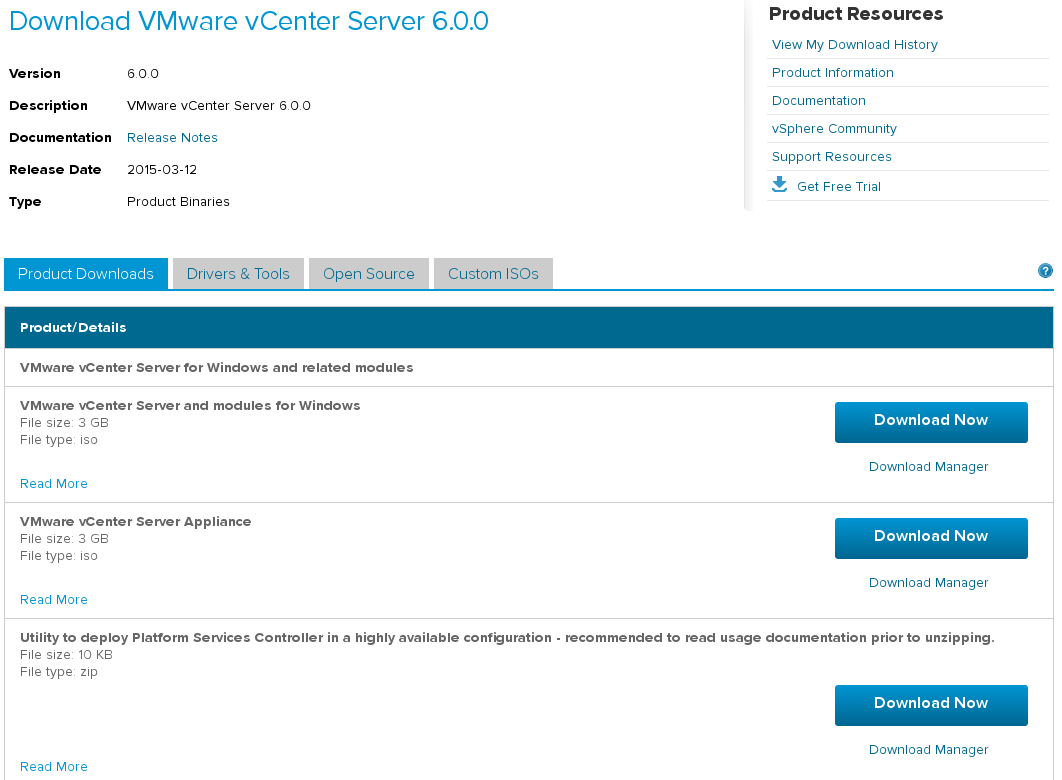
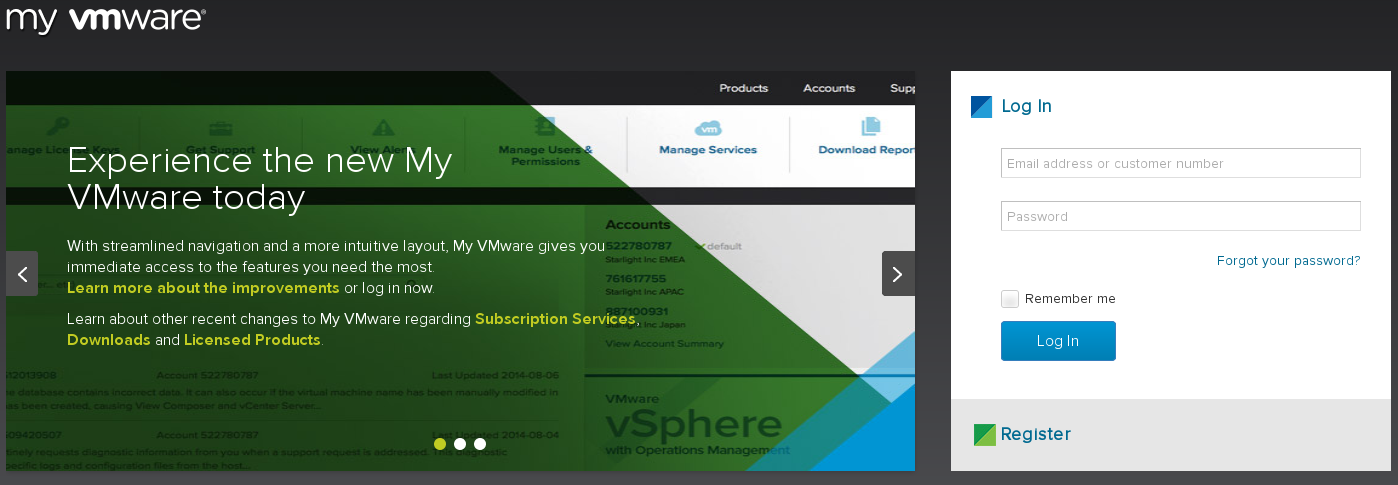
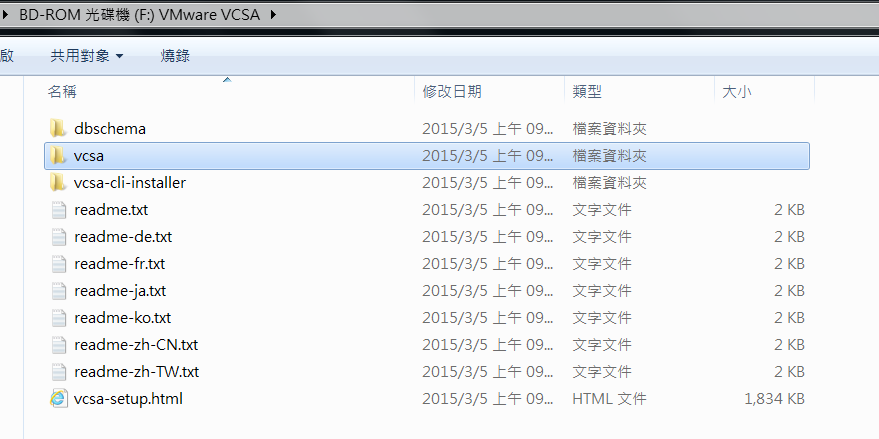


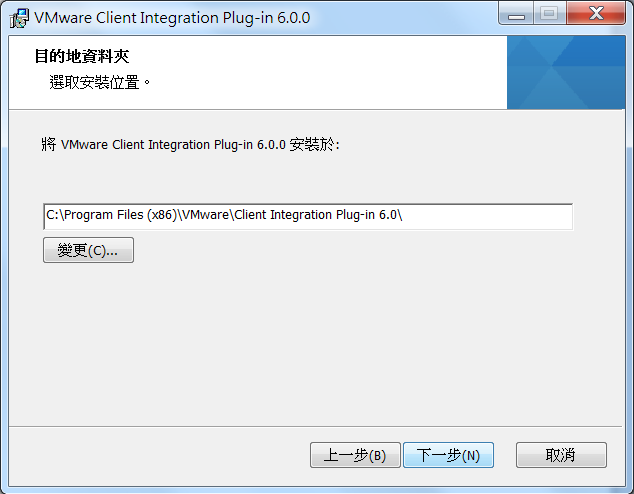






下載頁面
這個時候就會看到 VMware vCenter Server 6.0.0
點選 Go to Downloads
這個時候可以看到 vCenter Server 下載連結
我是使用 VMware vCenter Server Appliance, 點選他旁邊的 Download Now
這個時候會要求登入 VMware 帳號
請登入自己的VMware 帳號
登入完成之後就可以下載了.
然後就是參考文件中心的時間到了
下載之後因為是 iso 檔案, 所以要使用虛擬光碟的軟體把他掛載上來.
這個時候也會想, 執行的檔案都是 .exe 那 Linux and Mac 使用者是不是就一定要有 Windows 環境...
首先把 iso 掛載上來, 進入 vsca 目錄
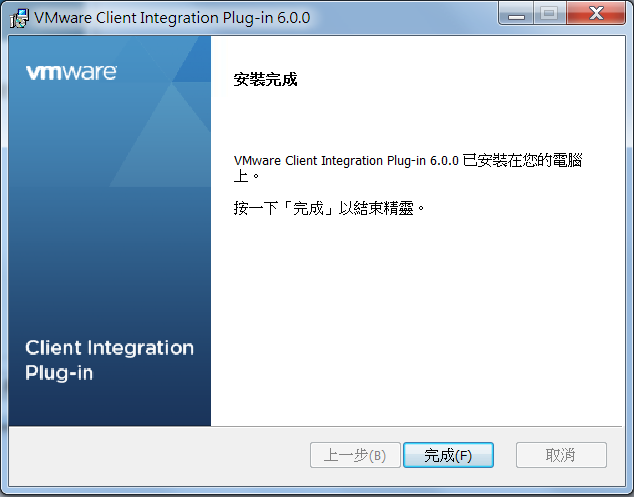
安裝 VMware Client Integration Plugin
出現安裝精靈, 點選 下一步
授權合約點選 我接受 -- > 點選下一步
選取目的地資料夾 -- > 點選 下一步
點選 安裝
點選 完成
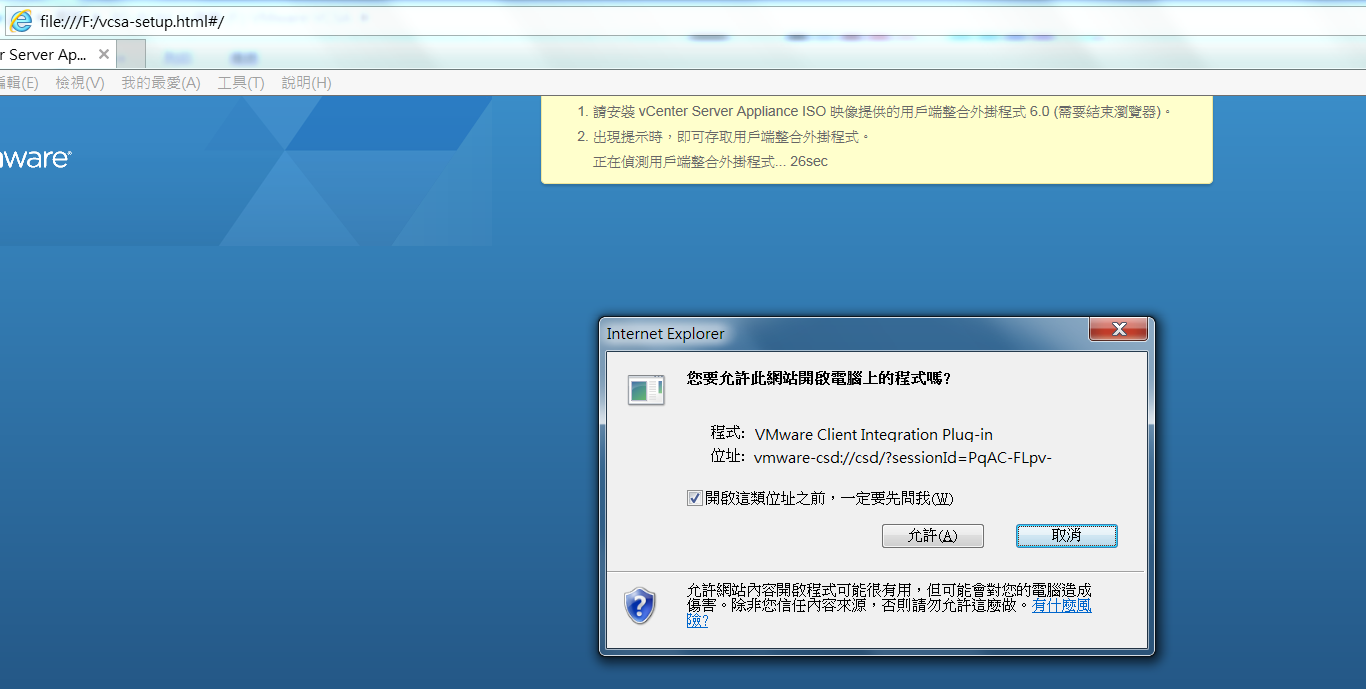
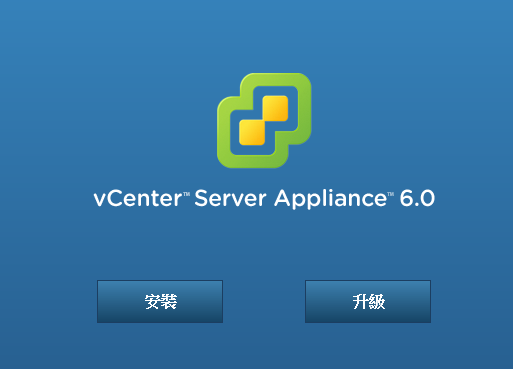
接下來點選 vcsa-setup.html 開始安裝 Vcenter
這邊會檢查 plugin , 這也是為何剛剛要先安裝的原因
點選 安裝
勾選 我接受 -- > 點選 下一步
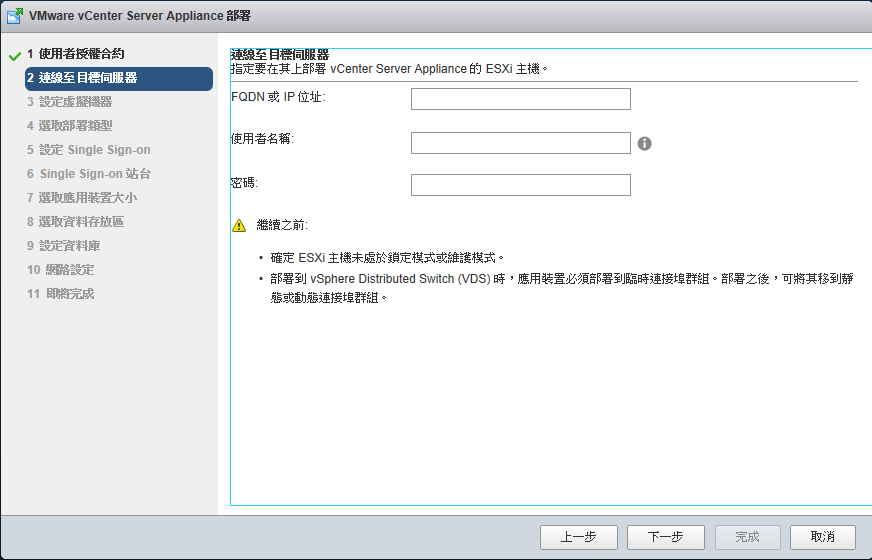
輸入 ESXi 主機 IP 還有帳號, 密碼 點選 下一步
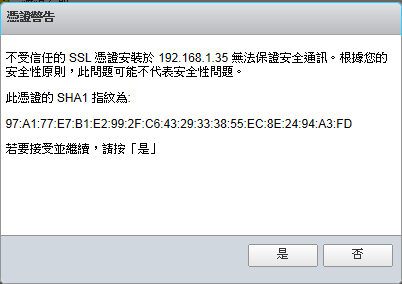
接受憑證警告, 點選 是
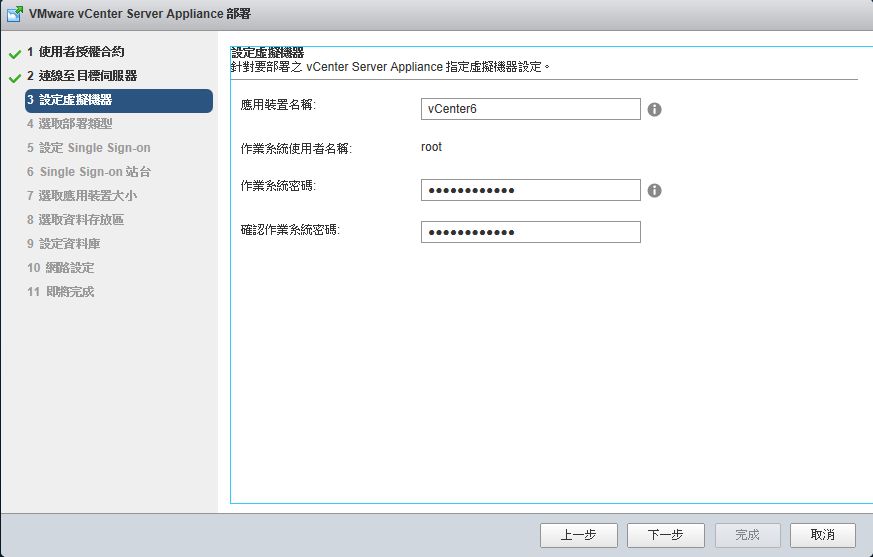
輸入 vCenter 主機名稱, 輸入之後管理者密碼, 點選 下一步
選取佈署類型, 如果沒有特殊需求的話, 將所有內嵌式整合在一起即可, 點選 下一步
SSO 設定, 這邊看是要建立新的還是要加入現有的 SSO 網域
這邊以建立新的為例, 輸入
SSO 密碼 / 網域名稱 / 站台名稱
點選 下一步
依照 vCenter 管理的 ESXi 主機選取大小
選取 下一步
選取 datastore ( 並看看要不要使用 thin 模式? )
點選 下一步
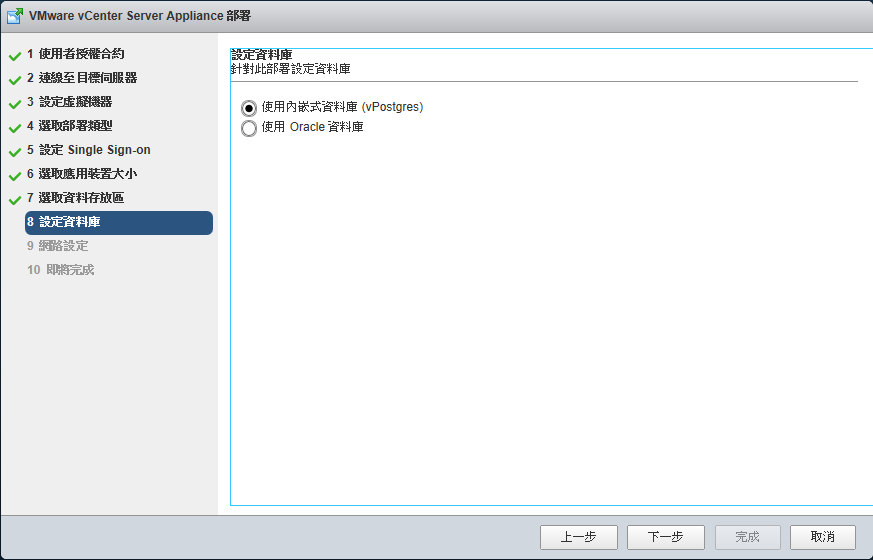
設定資料庫
我這邊是使用 內嵌式資料庫, 以 vCenter 6 的設定已經足夠
點選 下一步
設定 vCenter IP 相關設定
決定是否啟用 SSH, 以及 NTP 相關設定
點選 下一步
接下來就會自動完成佈署作業
參考: http://sakananote2.blogspot.tw/2015/04/20150413-vcenter6.html
2015年10月1日 星期四
在 Windows Server 2003 上安裝 KMS Server 與加入版權金鑰
From: Polin Wei


裝好 windows7 c
lient
端後,執行命令提示字元並使用管理者身分執行


再接著輸入 slmgr –ato 啟動 windows 7 ,此為第一台 windows 7 故會出現數量不足的提示視窗,此為正常現象

切換到 KMS Server 輸入 slmgr –dli 查看目前 windows 7 數量為 1 。

等累積到 25 台後, Client 端再次執行 slmgr –ato 就可以正常啟動。
參考:
http://blog.xuite.net/ganpin917/home/46562966-Windows+7+KMS+Server%E5%AE%89%E8%A3%9D%E8%88%87%E5%95%9F%E5%8B%95
https://sofree.cc/windows7-kms/
在企業環境啟動
windows 7
需使用到
KMS
或是
MAK
啟動,在此使用
KMS
來作為啟動
win7
的 Server
。首先到微軟網站下載
KMS
相關安裝套件
(
如下圖
)
,
KMS
安裝在
windows 2003 Server
上。
安裝好
KMS
套件後重新開機,開啟命令提示字元,輸入指令
slmgr
查看有哪些參數可以使用
接著輸入
slmgr –ipk
序號
來安裝
KMS
金鑰
輸入
slmgr –ato
連線到微軟線上啟動
KMS Server
指令
slmgr –dli
來查看目前啟動
windows
7 C
lient
數量,需要
25
台
vista/win7
才能正常啟動
在此
KMS Server
端已經安裝啟動完畢。目前
Client
數量為
0
裝好 windows
輸入
slmgr –skms [server
名稱
]
來指定要連線啟動的
KMS Server
再接著輸入 slmgr –ato 啟動 windows 7 ,此為第一台 windows 7 故會出現數量不足的提示視窗,此為正常現象
切換到 KMS Server 輸入 slmgr –dli 查看目前 windows 7 數量為 1 。
等累積到 25 台後, Client 端再次執行 slmgr –ato 就可以正常啟動。
參考:
http://blog.xuite.net/ganpin917/home/46562966-Windows+7+KMS+Server%E5%AE%89%E8%A3%9D%E8%88%87%E5%95%9F%E5%8B%95
https://sofree.cc/windows7-kms/
訂閱:
意見 (Atom)
-
From: Polin Wei 現在的即時通訊 MSN 、Skype ... 等工具,都具備有檔案傳輸的功能,小檔案或許沒問題,但若要傳個 10M 以上的檔,那連用 E-Mail 寄送可能都會無法達成。 可以嚐試在自己電腦中架設 FTP Server ( FTP 伺服器)...
-
From: Polin Wei 可以由 http://www.ocsinventory-ng.org/en/download/ 下載 OCS Inventory NG Server ,若是 CentOS 的 VM , 基本系統管理可以查看 Linux: CentO...
-
From: Polin Wei 軟體名稱:Spiceworks 軟體性質:免費 最近版本:6.2.91.9 作業系統:Windows XP/2000/vista/7/server2008 資料庫:自帶 語言界面:英文+中文 http://www.spi...


